
The first thing to do, after creating a new 360-degree-tour, is to customize the general settings of your tour. In this article you will find information on the different functions and settings available unter Tour-Settings in the editing section of your 360-degree-tour.
Publication-Status: Choose an access-mode for your 360-degree-tour.
- Public = The 360-degree-tour can be viewed without restrictions.
- Restricted Access = Access to your 360-degree-tour is restricted and an access-code is required to view the protected images of your 360-degree-tour. You can choose between manual and automatic user- authorization.
- Private = The 360-degree-tour is disabled for users, but can still be edited and used in the Showroom for guided tours.
Detailed information about how to use access restriction to generate leads can be found HERE.
Tour Information: Edit the general settings for your 360-degree-tour
Tour Name (required)
The tour name is publicly visible and is displayed in system emails and when publishing the 360-degree-tour social network.
Object-ID and Address
The Object-ID and Address are are for internal use only and displayed in the main menu of your account under the 360-degree-tour.
Contact Person: Assign a contract person to your 360-degree-tour
Select a contact person from the drop-down menu to assign it to your 360-degree-tour.
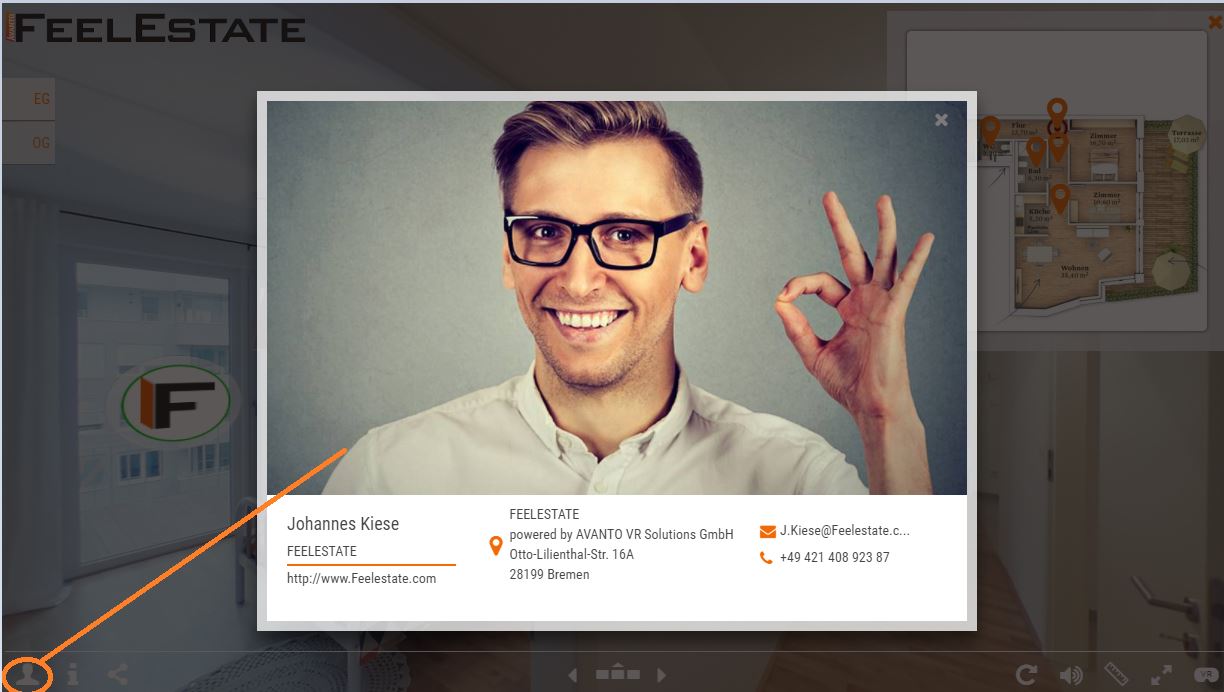
Learn how to create profiles for contact persons in the article Manage Contact Persons.
Exposé Information: Add general information to the Info-Button in your 360-degree-tour

Learn how to create Info-Content in the article Creating Info-Content templates
Settings: Here you can make some adjustments to functions available on your 360-degree-tour.
Enable Slow Automatic Rotation – If enabled, the view in your 360-degree-tour will start to rotate slowly when the 360-degree-tour is started or after a few seconds if a user is inactive.
Allow Zoom – Allow the user to zoom in and out in your 360-degree-tour.
Show Welcome-Pop-Up – If enabled, a welcome screen will appear whenever the 360-degree-tour is started showing an image of the assigned contact person and a short guide for navigation in the tour.
Show Social Media Button – If enabled, a share-button is added to the menu bar of your 360-degree-tour. This way users can easily share your 360-degree-tour through their social media accounts (Pinterest, Twitter, Facebook, Google+ und LinkedIN) or via email.
Enable Virtual Reality Mode – If enabled, the Virtual-Reality-Mode is available for your 360-degree-tours. In VR-Mode, users can watch the 360-degree-tour using a VR-Headset such as Google Cardboard, Oculus Rift or Samsung Gear VR.
Allow Measurement – If enabled, users can activate the Measurement-Mode to measure distances (ground level) in your 360-degree-tour.
Note: The distance between the ground and the center of the camera lens must be specified correctly for the system to provide reliable measurement results. When using a RICOH THETA camera with a FEELESTATE Monopod (fully extended), the predefined settings stored in the system can be used.
Tripod patch (VR mode / measure mode) – Select the size of the sticker (batch) that covers the area underneath the camera in Measurment-Mode and Virtual Reality Mode, where the camera tripod is visible.
Background Music: Select a music title to be played in your 360-degree-tour
- Start Playing Music Automatically – If enabled, the music will play automatically whenever the 360-degree-tour is started. Users can turn on and off the music at any time if a music title is selected.
Type of Navigation Buttons: Choose a design for the navigation buttons in your 360-degree-tour.
There are two designs available for the navigation buttons:
- Arrows – To be placed on the ground level. Arrows turn red if pointing to a room that was already visited.
- Logo-Buttons – To be placed to chest height. The Logo-Buttons will show the Button-Logo that you uploaded in the Account Settings.