
In this article we explain step-by-step how to shoot 360-degree-pictures with your RICOH THETA camera and the FEELESTATE HDR app, and how to upload 360-degree footage directly from your smartphone/tablet to your FEELESTATE account.
Step 1: Install the FEELESTATE HDR app on your smartphone or tablet (iOS & Android).
A complete guide on how to install the app can be found HERE.
Step 2: Connect your mobile device to the Wi-Fi connection of your RICOH THETA
- Turn on your RICOH THETA camera and press the Wi-Fi-Button on the side of the camera until the Wi-Fi-Icon on the camera lights up. The Wi-Fi-light of some RICOH THETA models is located at the front of the camera.

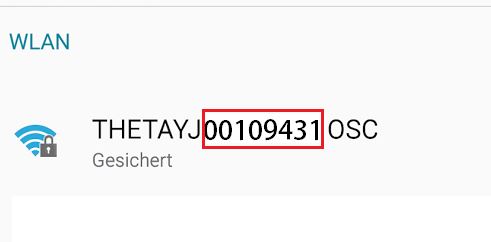
- On your mobile device, open Network Management and select the wireless network connection of the RICOH THETA camera.
Note: The password for the wireless network connection can be found on the bottom of the camera and in the name of the wireless network connection. It consists of 8 digits (no letters) and usually starts with 00 (zero zero).

- Now that you’ve connected your mobile device to the camera network, open the THETA HDR app and select “Connect to THETA” in the app’s Camera menu.
Note: If you are unable to connect to the RICOH THETA camera, check the wireless connection on your mobile device.
Step 3: Activate the HDR function
- In the RICOH THETA HDR app, open the camera menu and select the “Activate HDR Button” to use this feature for your RICOH THETA recordings.
Note: Activating the HDR-Function is highly recommended for a better exposure and image quality.
Step 4: Taking 360-degree-pictures
- Leave the room if you do not want to appear in the 360-degree-picture.
- Press the Start-Button to take the 360-degree-picture.
Note: If the HDR-Funtion is activated, 3 shots will be shot consecutively, so you will hear the beep of your RICOH THETA camera 3 times. Do not enter the room until all 3 shots have been taken!
- After the 360-degree-image has been taken, it will be displayed on your device. Now you can choose from the following options in the upper right corner of your mobile device screen:
Name: Name the image (e.g. living room, bathroom, etc).
Delete: Here you can delete the current image.
Upload: Here you can upload the image directly to a 360-degree-tour in your FEELESTATE account.
- Name the image an select back so that you can repeat the 360-degree-shooting in all the rooms that you want to add to your 360-degree-tour.
Step 5: Connect to your FEELESTATE account and upload pictures
- Select the menu item “Settings” in the RICOH THETA HDR app.
- Enter the login details of your FEELESTATE account (E-Mail-Address + Password) to connect your FEELESTATE account with the RICOH THETA HDR app.
Step 6: Upload your 360-degree-images into a 360-degree-tour in your FEELESTATE account
- Select the menu item Gallery in the app to view all your 360-degree-images, sorted by date of creation.

- Choose an images and select “Upload” in the upper right corner of the screen.
Note: If you do not want to upload multiple images to a 360-degree-tour in your FEELESTATE account, use “Select” and mark all 360-degree-images that you would like to upload.
- Choose a 360-degree-tour to which you want to upload the selected 360-degree-image(s).
- Use “Upload Now” to load all of the selected 360-degree- images into the selected 360-degree-tour.
Once the upload is completed, the images will be visible in the selected 360-degree-tour in your FEELESTATE account.